This article will be extremely beneficial for students who need some help in designing a 3D model of a plant cell. Read on.
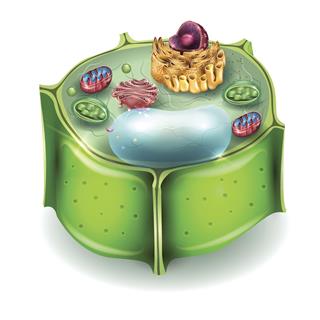
This article separates the task at hand into two parts. First, you must gather all the information on the plant cell structure, before starting to handle the materials that will go into making the model. You may refer to your biology textbook or access the Internet to collect the required information. Jot down the data that interests you such as color, shape and position of these parts in relation to each other. This information will come useful while making your 3D model. The following paragraph details how to make a 3D model for your biology project.
Cover the insides of a plastic container with a piece of thin plastic paper. The size of the paper must be such that, in addition to covering the walls and the bottom of the container, it should stick out above the top of the container for 1 inch. We are treating the walls of the container as the wall of the plant cell and paper laid inside it as the membrane.
- For the cytoplasm, in which the organelles are suspended or are embedded, we will use soft and pliable white clay. Apply a thin layer of this material to cover the sides and the bottom of the container.
- For the nucleus, make a small ball of white clay and paint it purple. It shouldn’t be more than the size of a plum. Use plastic paper to wrap it. The paper represents the nuclear membrane.
- A small half-inch ball of white clay painted with orange color will stand in for the centrosome.
- Mitochondria are elongated bodies. With the help of white clay make 5 jelly-beaned shaped structures. With the help of a blunt tipped object, create grooves on their surface so that each object resembles a raisin. Paint each of the mitochondria with red color.
- Golgi bodies can be modeled out of a flat strip of white clay that is 1 inch wide and 5 inches long. Fold the strip back and forth over itself, so that the shape that comes out of its layered form resembles golgi bodies.
- In a plant cell, we find Rough Endoplasmic Reticulum (RER) and Smooth Endoplasmic Reticulum (SER). To imitate these, we will use two sections (6-inches long) of a thick thread. Apply glue to a section and dip it into the seed beads. This rough structure will represent RER and the other section of thread will stand proxy for SER.
- Use white clay to make 12 flat, circular pancake like shapes (diameter of 1 inch). Make 4 stacks out of these. Stick together, with the help of glue, 3 pancakes of white clay per each stack. Paint the stacks using green color. These are the 4 chloroplasts of our plant cell model.
- Fill a small plastic bag with air and seal it over the candle flame.
- Take out your textbook and refer to the labeled cell diagram and functions of cell parts in it once again.
- Now, it is time to arrange all the parts of the plant cell model in their proper position. Space out the cell parts inside the container, appropriately. Add white clay around the cell parts.
- Take some seed beads and color them using pink. Place small clusters of these inside the container in several places. These represent the ribosomes.
- Write names on the small piece of paper and attach them to the end of toothpicks.
- Identify and label the parts of the model by sticking toothpicks into them.
- Make a chart, giving information on the cell parts and keep it by the side of your model.
Other Ideas to Make Plant Cell Model
When it comes to choosing the materials to make 3D model, there are so many options which you can explore.
- Colored Papers: Different colored papers can be used to make hollow organs of the plant cell. Take care to cut the papers in proper shapes to represent the organs as closely as possible and glue properly to create 3D shapes. Glue or stick them inside a bowl.
- Cake: You can take a large, flat and round shaped cake and use different colored icing to shape cell organs on the cake.
- Stuffed Cloths: Cut cloth in proper shape and sew it to make cell organs, stuff these items with sponge or newspaper to give them proper shape and tone.
The model is ready to be displayed. You don’t have to use white clay to make the model. Additional information is available on the Internet.

